Notification Service Extension was introduced from iOS 10 using XCode 8 or later. This extension can modify the contents of notifications before they are displayed on the operating system. Notification Service Extension also can be used to download content. For example, to download images related to notifications and display it on a notification banner.

Lifecycle of Notification Service Extension
Lifecycle of Notification Service Extension is:
- The application receives a notification.
- The system creates extension from notification and runs in the background.
- The extension will perform the function to modify or download content.
- Notifications will be displayed to users.
Following Conditions for Notification Service Extension
XCode has provided a template for the UNNotificationServiceExtension. This template contains subclasses with methods and used to modify content easily. When the notification is received by the user, the system will detect UNNotificationServiceExtension and run the didReceive (_: withContentHandler 🙂 method. This method can only be run if comply to these rules:
- The remote notification must load the aps object. This aps dictionary contains keys to send notifications to the user’s device.
- The remote notification must load the alert object and it requires a mutable-content key.
- Alert objects contain information from notifications and mutable-content is a flag for running notification extensions. If the flag has a value of 1, the system will send a notification to the extension for processing the content before it is displayed.
This is a remote notification payload for showing an alert with preview image.
{
    "aps": {
        "alert": {
            "title": "Beautiful View",
            "subtitle": "",
            "body" : "Denali, Alaska",
        },
    	"mutable-content": 1
    },
    "attachment-url": "https://www.nps.gov/dena/learn/nature/images/wildlife-landing.jpg”
}
Please note that the attachment-url key is only used based on the requirement of your application, not the standard from iOS.
The didReceive (_: withContentHandler 🙂 method is the main method for running extensions. However, this method has a limited amount of time in performing its task. If the didReceive method did not finish in time, the system calls the serviceExtensionTimeWillExpire () method. This method gives you one last chance before changing the notification content. If it was not updated before the time expires, the system displays the original content.
Setting Up Extension on Your Project
- Create a simple app to display the place’s name and picture.

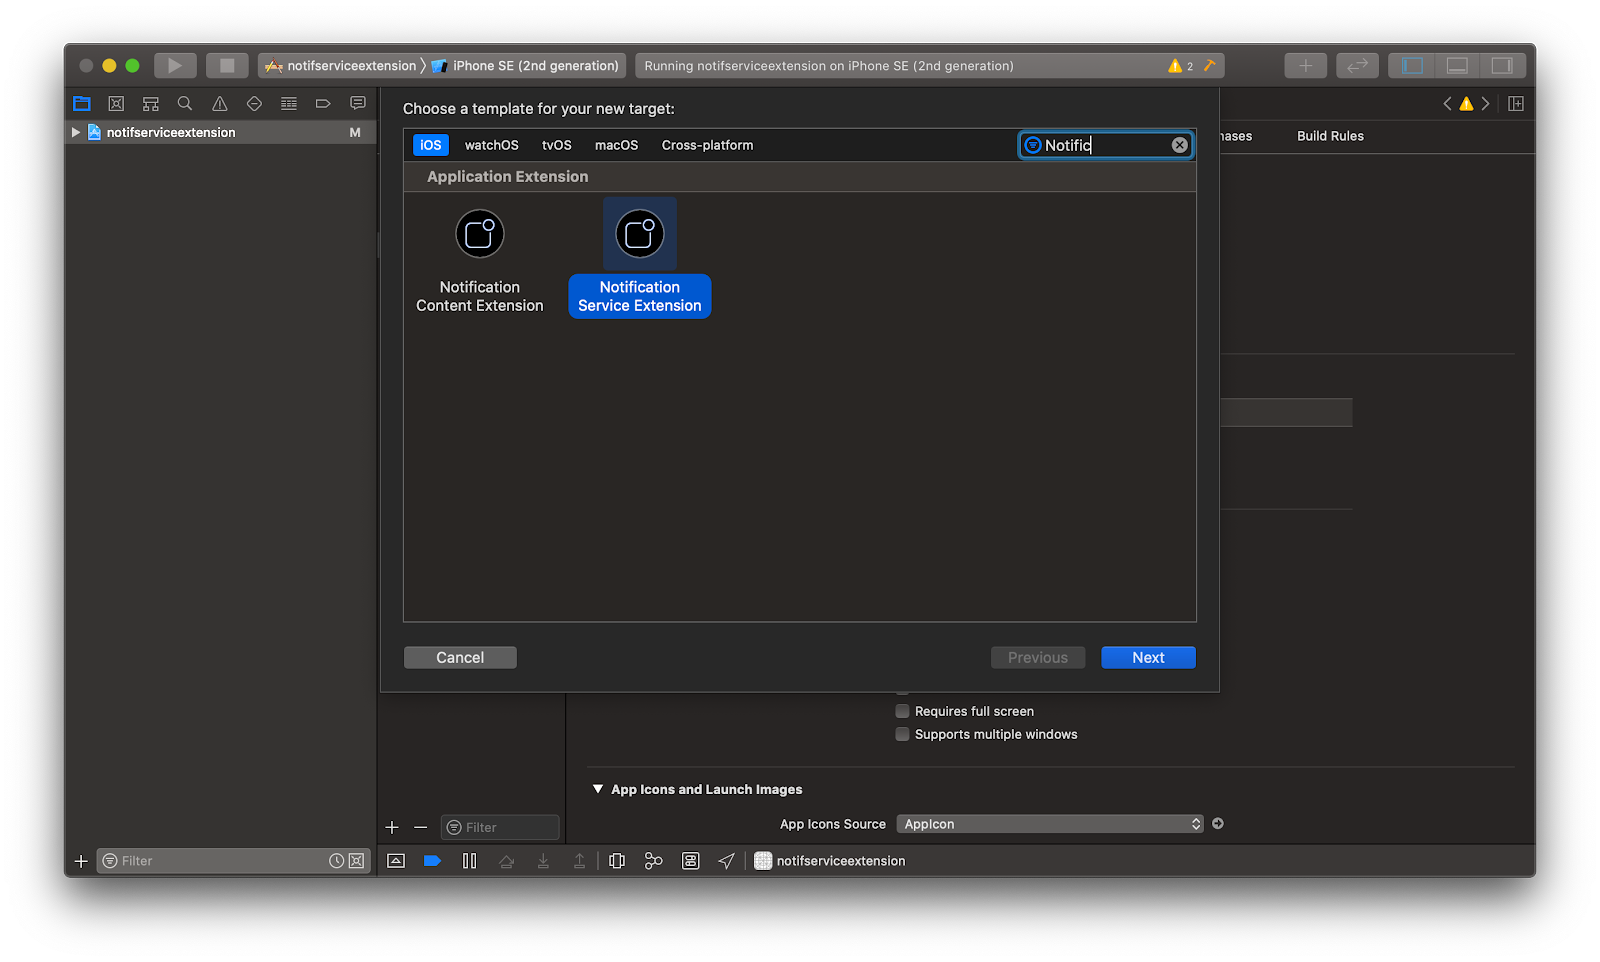
- Create a new target for Notification Service Extension with File > New > Target > Search Notification Service Extension, then Next.
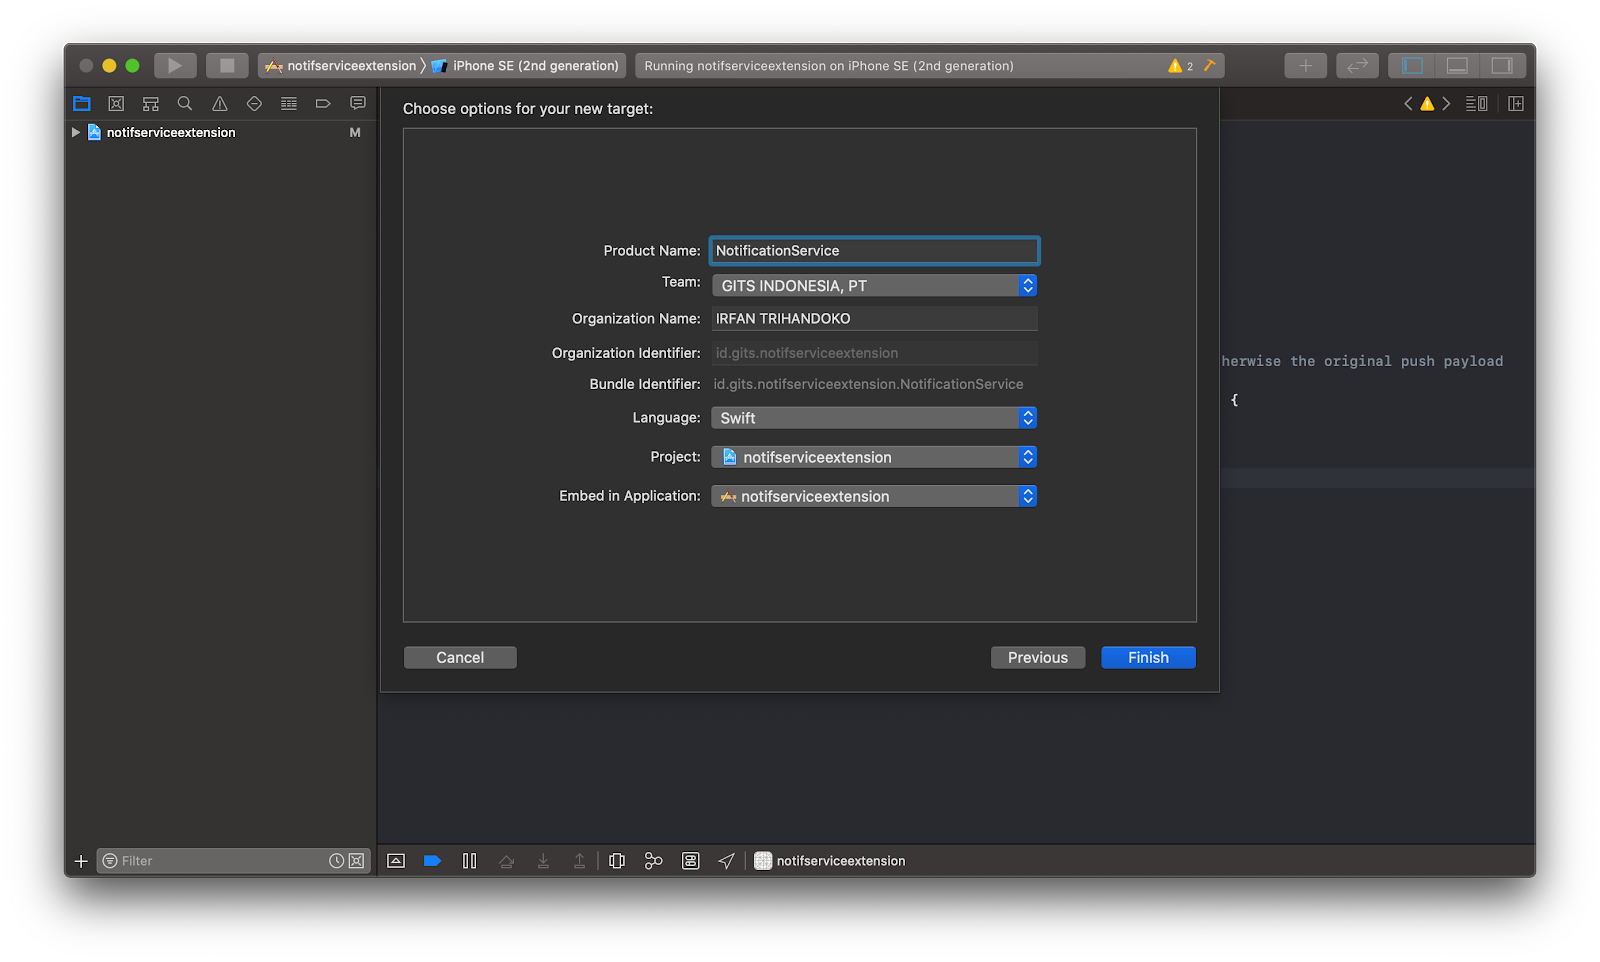
- Give a name. For example: NotificationService, then click Finish. When a dialog appears to activate the target extension, just choose to Cancel. The dialog option is to change the target from the app to the extension.
- Add App Groups to the target application and notification extension on the Signing & Capabilities tab. Then, create an id for App Groups by clicking the + button in the App Groups section and check whether the id has been added plus give a checkmark on it. Finally, add capabilities for Push Notifications.

- After completing the setup, we need permission to push notifications into the application. Add permission in AppDelegate.swift file.
    func application(_ application: UIApplication, didFinishLaunchingWithOptions launchOptions: [UIApplication.LaunchOptionsKey: Any]?) -> Bool {
        // Override point for customization after application launch.
        if #available(iOS 10.0, *) {
            // For iOS 10 display notification (sent via APNS)
            UNUserNotificationCenter.current().delegate = self
            let authOptions: UNAuthorizationOptions = [.alert, .badge, .sound]
            UNUserNotificationCenter.current().requestAuthorization(
                options: authOptions,
                completionHandler: {_, _ in })
        } else {
            let settings: UIUserNotificationSettings =
                UIUserNotificationSettings(types: [.alert, .badge, .sound], categories: nil)
            application.registerUserNotificationSettings(settings)
        }
        application.registerForRemoteNotifications()
        return true
    }
- You can check whether the push notification is configured correctly and see your device token for the remote notification.
   func application(_ application: UIApplication, didRegisterForRemoteNotificationsWithDeviceToken deviceToken: Data) {
        let tokenChars = (deviceToken as NSData).bytes.bindMemory(to: CChar.self, capacity: deviceToken.count)
        var tokenString = ""
        for i in 0..<deviceToken.count {
            tokenString += String(format: "%02.2hhx", arguments: [tokenChars[i]])
        }
        print("Successfully registered for notifications!")
        print("Device Token:", tokenString)
    }

    func application(_ application: UIApplication, didFailToRegisterForRemoteNotificationsWithError error: Error) {
        print("Failed to register for notifications: \(error.localizedDescription)")
    }
Processing Notifications in the Background
- Go to the NotificationService.swift file, then enter the didReceive function. In this section, you can change the notification content before it is displayed. Example: You can modify the notification title by adding [Modified] text like the example below.
    override func didReceive(_ request: UNNotificationRequest, withContentHandler contentHandler: @escaping (UNNotificationContent) -> Void) {
        self.contentHandler = contentHandler
        self.bestAttemptContent = (request.content.mutableCopy() as? UNMutableNotificationContent)

        guard let bestAttemptContent = self.bestAttemptContent else { return }
        // Modify the notification content here...
        bestAttemptContent.title = "\(bestAttemptContent.title) [Modified]"
        contentHandler(bestAttemptContent)
    }
- Next, save the notification data using UserDefaults with the App Group ID. Since this extension is different target with the application, it requires App Group.
        guard let bestAttemptContent = self.bestAttemptContent else { return }
        // Modify the notification content here...
        bestAttemptContent.title = "\(bestAttemptContent.title) [Modified]"
        // Save notification data to UserDefaults
        let data = bestAttemptContent.userInfo as NSDictionary
        let pref = UserDefaults.init(suiteName: "group.id.gits.notifserviceextension")
        pref?.set(data, forKey: "NOTIF_DATA")
        pref?.synchronize()
        contentHandler(bestAttemptContent)
- If you want to display images from the remote notification into the notification banner, it is necessary to download the image URL (provided by the notification) into the file. Create a function to download the URL into the data using the extension from UNNotificationAttachment. And, save it in UserDefaults, to be displayed in the main app.
-
- Step 1:
extension UNNotificationAttachment {
    static func download(imageFileIdentifier: String, data: Data, options: [NSObject : AnyObject]?)
        -> UNNotificationAttachment? {
            let fileManager = FileManager.default
            if let directory = fileManager.containerURL(forSecurityApplicationGroupIdentifier: "group.id.gits.notifserviceextension") {
                do {
                    let newDirectory = directory.appendingPathComponent("Images")
                    if !fileManager.fileExists(atPath: newDirectory.path) {
                        try? fileManager.createDirectory(at: newDirectory, withIntermediateDirectories: true, attributes: nil)
                    }
                    let fileURL = newDirectory.appendingPathComponent(imageFileIdentifier)
                    do {
                        try data.write(to: fileURL, options: [])
                    } catch {
                        print("Unable to load data: \(error)")
                    }
                    let pref = UserDefaults(suiteName: "group.id.gits.notifserviceextension")
                    pref?.set(data, forKey: "NOTIF_IMAGE")
                    pref?.synchronize()
                    let imageAttachment = try UNNotificationAttachment.init(identifier: imageFileIdentifier, url: fileURL, options: options)
                    return imageAttachment
                } catch let error {
                    print("Error: \(error)")
                }
            }
            return nil
    }
}
-
- Step 2:
    override func didReceive(_ request: UNNotificationRequest, withContentHandler contentHandler: @escaping (UNNotificationContent) -> Void) {
        self.contentHandler = contentHandler
        bestAttemptContent = (request.content.mutableCopy() as? UNMutableNotificationContent)

        guard let bestAttemptContent = bestAttemptContent else { return }
        // Modify the notification content here...
        bestAttemptContent.title = "\(bestAttemptContent.title) [Modified]"
        // Save notification data to UserDefaults
        let data = bestAttemptContent.userInfo as NSDictionary
        let pref = UserDefaults.init(suiteName: "group.id.gits.notifserviceextension")
        pref?.set(data, forKey: "NOTIF_DATA")
        pref?.synchronize()

        guard let attachmentURL = bestAttemptContent.userInfo["attachment-url"] as? String else {
            contentHandler(bestAttemptContent)
            return
        }

        do {
            let imageData = try Data(contentsOf: URL(string: attachmentURL)!)
            guard let attachment = UNNotificationAttachment.download(imageFileIdentifier: "image.jpg", data: imageData, options: nil) else {
                contentHandler(bestAttemptContent)
                return
            }
            bestAttemptContent.attachments = [attachment]
            contentHandler(bestAttemptContent.copy() as! UNNotificationContent)
        } catch {
            contentHandler(bestAttemptContent)
            print("Unable to load data: \(error)")
        }
    }

    override func serviceExtensionTimeWillExpire() {
        // Called just before the extension will be terminated by the system.
        // Use this as an opportunity to deliver your "best attempt" at modified content, otherwise the original push payload will be used.
        if let contentHandler = contentHandler, let bestAttemptContent =  bestAttemptContent {
            contentHandler(bestAttemptContent)
        }
    }
- Show notification data that has been saved through the App Group.
import UIKit

class ViewController: UIViewController {

    @IBOutlet weak var dataLbl: UILabel!
    @IBOutlet weak var dataImg: UIImageView!

    override func viewDidLoad() {
        super.viewDidLoad()
        // Do any additional setup after loading the view.
        NotificationCenter.default.addObserver(self, selector: #selector(becomeActive), name: UIApplication.didBecomeActiveNotification, object: nil)
    }

    override func viewDidAppear(_ animated: Bool) {
        super.viewDidAppear(animated)
        self.handleNotifData()
    }

    func handleNotifData() {
        let pref = UserDefaults.init(suiteName: "group.id.gits.notifserviceextension")
        let notifData = pref?.object(forKey: "NOTIF_DATA") as? NSDictionary
        let aps = notifData?["aps"] as? NSDictionary
        let alert = aps?["alert"] as? NSDictionary
        let body = alert?["body"] as? String

        self.dataLbl.text = "\(body ?? "-")"
        // Getting image from UNNotificationAttachment
        guard let imageData = pref?.object(forKey: "NOTIF_IMAGE") else { return }
        guard let data = imageData as? Data else { return }
        self.dataImg.image = UIImage(data: data)
    }

    @objc func becomeActive() {
        self.handleNotifData()
    }

    @IBAction func refreshAction(_ sender: UIButton) {
        self.handleNotifData()
    }

}
Processing Notifications in the Foreground
Use userNotificationCenter(_:willPresent:withCompletionHandler:) of the UNUserNotificationCenter object’s delegate to process the notification and let the system know how you want it to proceed.
extension AppDelegate: UNUserNotificationCenterDelegate {

    // Receive displayed notifications for iOS 10 or later devices.
    func userNotificationCenter(_ center: UNUserNotificationCenter, willPresent notification: UNNotification, withCompletionHandler completionHandler: @escaping (UNNotificationPresentationOptions) -> Void) {
        let userInfo = notification.request.content.userInfo
        print("Receive notification in the foreground \(userInfo)")
        let pref = UserDefaults.init(suiteName: "group.id.gits.notifserviceextension")
        pref?.set(userInfo, forKey: "NOTIF_DATA")
        guard let vc = UIApplication.shared.windows.first?.rootViewController as? ViewController else { return }
        vc.handleNotifData()
        completionHandler([.alert, .badge, .sound])
    }
}
Test Your Application Notification
How to test app notifications?
- First, we need a Pusher tool. This tool is available on Github (https://github.com/noodlewerk/NWPusher/releases/tag/0.7.5). Download and install it.
- Input the device token into the Pusher tool. Select the push certificate based on the bundle ID and enter the payload for remote notifications, then Push.
- You must test using a device, not a simulator. Known Issues: https://developer.apple.com/documentation/xcode-release-notes/xcode-11_4-release-notes (Notification Service Extensions do not work in simulated push notifications. The mutable-content key is not honored. (55822721)).
Conclusion
Notification Service Extension is useful for storing notification data in the background mode or when inactive. We can also use this service to download content, such as to show an image on a notification banner as explained above.
This tutorial is a basic concept for implementing notification service extension. You can improvise from the tutorial above and adjust with the requirement of the application that you are going to develop. Thanks for reading!