How to make app widgets in different sizes? With three different sizes available (small, medium, and large), widgets can display a wide range of information. When users stack widgets and enable Smart Rotate, WidgetKit automatically rotates the most relevant widget to the top, making sure users see the most important details. In previous article about make app widgets, we have made an app widget that only supports small widgets. Now we will add a medium widget and a large widget as well.
Note: In this tutorial, I’m using Xcode 12.2 and maybe some configurations will be different with your environment.
The starter project for this tutorial is the final project of the previous article, so make sure to complete the previous tutorial before continue to this article. You can find the starter project for this tutorial here.
Supporting Multiple Widget Sizes
To support different widget sizes, open the HeartyRecipe workspace on Xcode and go to HeartyRecipeWidget.swift file. Modify the HeartyRecipeWidget struct by adding .systemMedium and .systemLarge to the arguments in the supportedFamilies modifier.
@main
struct HeartyRecipeWidget: Widget {
    let kind: String = "HeartyRecipeWidget"
    var body: some WidgetConfiguration {
        StaticConfiguration(kind: kind, provider: Provider()) { entry in
            HeartyRecipeWidgetEntryView(entry: entry)
        }
        .configurationDisplayName("Hearty Recipe Widget")
        .description("Display a widget with a random recipe that is updated every 1 hour.")
        .supportedFamilies([.systemSmall, .systemMedium, .systemLarge])
    }
}
Now, run your app and make sure the HeartyRecipeWidgetExtension is the active scheme, then go into jiggle mode. Next, press the “+” button on the top right corner and select the HeartyRecipe app.

The HeartyRecipe widget gallery will appear and you will see the 3 different widget sizes you can add to your homescreen.

How to Make Widget View For Different Widget Sizes
Because a lot of space is going unused in systemMedium and systemLarge widgets, we’re going to modify the views displayed. The systemMedium widget will show the recipe image along with its name, duration, portion, and ingredients. Then the systemLarge widget will also show the recipe instructions. So, navigate to the HeartyRecipeWidgetView.swift and add a new View struct called HeartyRecipeWidgetMediumView.
struct HeartyRecipeWidgetMediumView: View {
    var recipe: RecipeBaseClass?

    var body: some View {
        ZStack(alignment: .top) {
            Color(.white)
            GeometryReader {
                geometry in
                HStack(alignment: .top) {
                    Image.loadLocalImage(image: recipe?.imageURL ?? "")
                        .centerCropped()
                        .frame(width: geometry.size.height)
                        .cornerRadius(10)

                    VStack(alignment: .leading) {
                        Text(recipe?.name ?? "")
                            .font(.system(size: 14, weight: .semibold, design: .default))
                            .multilineTextAlignment(.leading)

                        Text("\(recipe?.getTime() ?? "") • \(recipe?.serving ?? "1 portion")")
                            .font(.system(size: 12, weight: .regular, design: .default))

                        let array: [String] = recipe?.ingredients?.map({
                            $0.name ?? ""
                        }) ?? []
                        let joinedString  = array.joined(separator: "; ")
                        Text("\(joinedString)")
                            .font(.system(size: 12, weight: .regular, design: .default))
                            .padding(.top, 1)
                    }
                }
            }
            .padding()
        }
    }
}
Next, add another View struct named HeartyRecipeWidgetLargeView.
struct HeartyRecipeWidgetLargeView: View {
    var recipe: RecipeBaseClass?

    var body: some View {
        ZStack(alignment: .top) {
            Color(.white)
            GeometryReader { geometry in
                VStack(alignment: .leading) {
                    Text(recipe?.name ?? "")
                        .font(.system(size: 16, weight: .semibold, design: .default))
                        .multilineTextAlignment(.leading)

                    Image.loadLocalImage(image: recipe?.imageURL ?? "")
                        .centerCropped()
                        .frame(height: geometry.size.width/2)
                        .cornerRadius(10)

                    VStack(alignment: .leading, spacing: 2) {
                        HStack(alignment: .top, spacing: 2) {
                            Text("Ready in: ")
                                .font(.system(size: 12, weight: .semibold, design: .default))
                                .fontWeight(.semibold)
                            Text("\(recipe?.getTime() ?? "30 mins")")
                                .font(.system(size: 12, weight: .regular, design: .default))
                        }
                        HStack(alignment: .top, spacing: 2) {
                            Text("Serves: ")
                                .font(.system(size: 12, weight: .semibold, design: .default))
                                .fontWeight(.semibold)
                            Text("\(recipe?.serving ?? "1 portion")")
                                .font(.system(size: 12, weight: .regular, design: .default))
                        }
                    }
                    // ingredients string
                    let array: [String] = recipe?.ingredients?.map({
                        $0.name ?? ""
                    }) ?? []
                    let ingredients  = array.joined(separator: "; ")

                    (Text("Ingredients: ").fontWeight(.bold) + Text("\(ingredients)"))
                        .font(.system(size: 12, weight: .regular, design: .default))
                        .padding(.top, 2)

                    // instruction string
                    let steps = (recipe?.steps ?? []).joined(separator: " • ")
                    (Text("Instructions: ").fontWeight(.bold) + Text("\(steps)"))
                        .font(.system(size: 12, weight: .regular, design: .default))
                        .padding(.top, 2)
                }
            }
            .padding()
        }
    }
}
Now, move the code under the HeartyRecipeWidgetView struct into a new HeartyRecipeWidgetSmallView View.
struct HeartyRecipeWidgetSmallView: View {
    var recipe: RecipeBaseClass?

    var body: some View {
        ZStack(alignment: .top) {
            Color(.white)
            VStack(alignment: .leading) {
                Image.loadLocalImage(image: recipe?.imageURL ?? "")
                    .centerCropped()
                    .frame(height: 64)
                    .cornerRadius(10)

                Text("\(recipe?.getTime() ?? "") • \(recipe?.serving ?? "1 portion")")
                    .font(.system(size: 10, weight: .regular, design: .default))
                Text(recipe?.name ?? "")
                    .font(.system(size: 12, weight: .semibold, design: .default))
                    .multilineTextAlignment(.leading)
            }
            .padding()
        }
    }
}
We will modify HeartyRecipeWidgetView to include a WidgetFamily property by using the Environment wrapper to allow us to read the widget’s widgetFamily value directly from the HeartyRecipeWidgetView’s environment. Then, we will determine the size of the widget and return one of the views we just made based on the value of the family property. In order to do this, we will also need to add the ViewBuilder wrapper to the body.
import Foundation
import SwiftUI
import WidgetKit
import HeartyRecipeHelper
struct HeartyRecipeWidgetView: View {
    var recipe: RecipeBaseClass?

    @Environment(\.widgetFamily) var family: WidgetFamily
    @ViewBuilder
    var body: some View {
        switch family {
        case .systemSmall:
            HeartyRecipeWidgetSmallView(recipe: recipe)
        case .systemMedium:
            HeartyRecipeWidgetMediumView(recipe: recipe)
        case .systemLarge:
            HeartyRecipeWidgetLargeView(recipe: recipe)
        @unknown default:
            EmptyView()
        }
    }
}
Now you can run the widget and open the widget gallery to add the different sizes of our widget.

Handle The Widget Tap Action
Tap the widget and see what happens.
The widget will just launch the app. It’s better to show the DetailRecipeView View to show the detailed recipe rather than just open the app. To do this, we will use the widgetURL modifier to supply a URL to HeartyRecipeWidget.
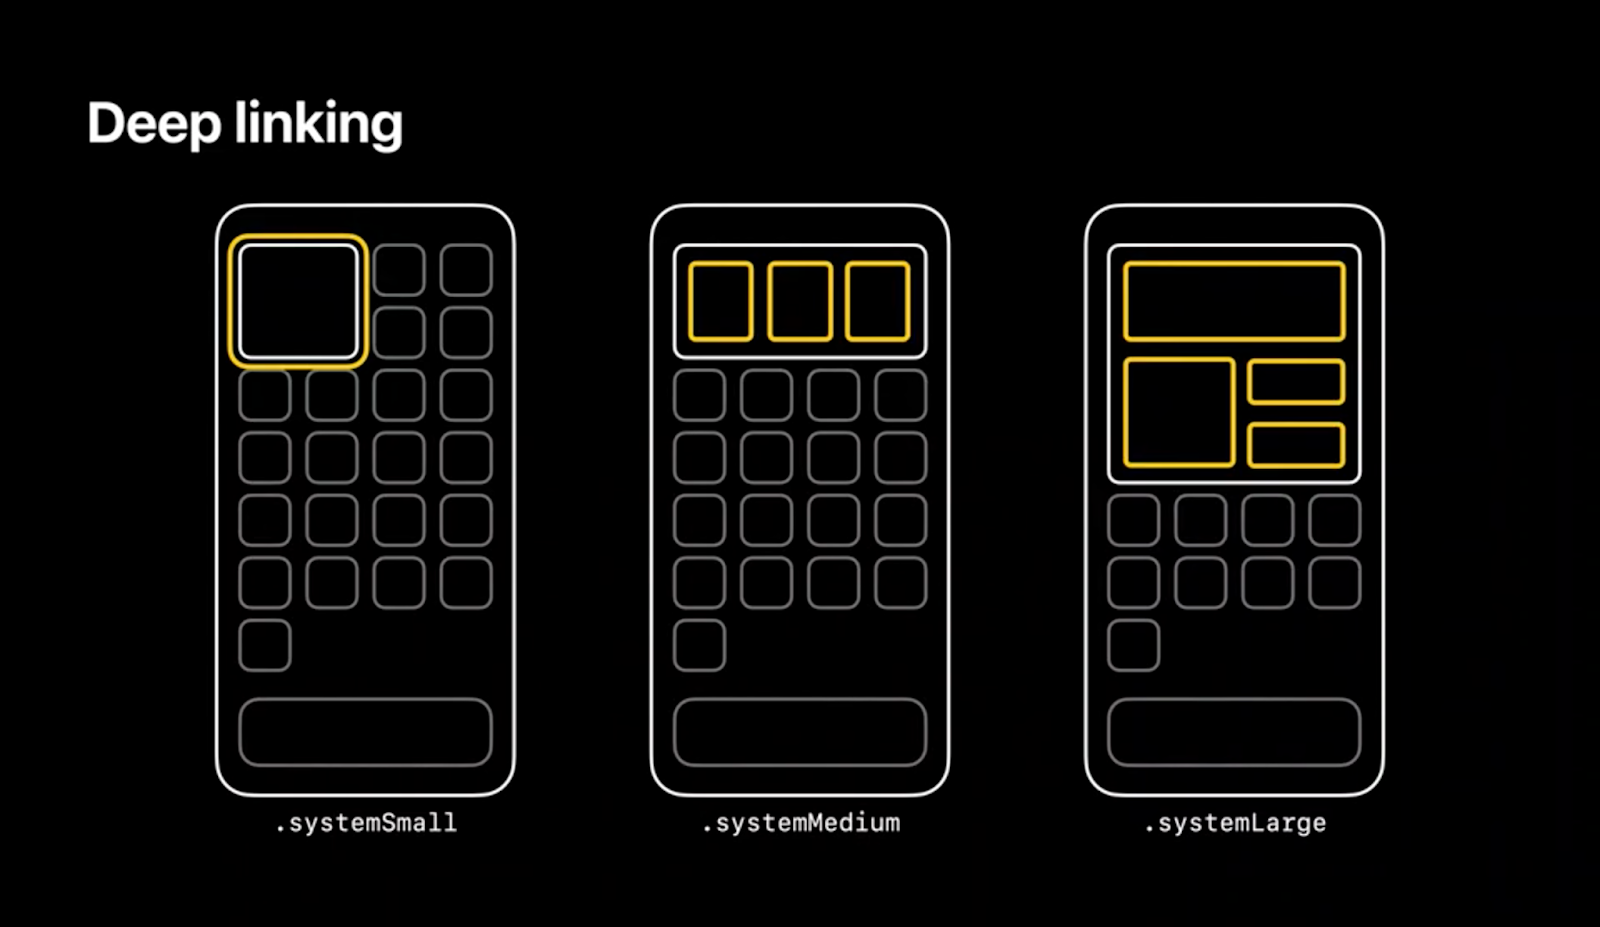
The systemSmall widgets are one large tap area, while systemMedium and systemLarge widgets have multiple tappable zones. That means, systemSmall widgets only can deep link into one section of your app, while systemMedium and systemLarge widgets can either use the widgetURL modifier or the SwiftUI Link API to have tappable zones to link to different pages.
For now, we will add the widgetURL modifier to our systemSmall widget, HeartyRecipeWidgetSmallView.
Note: This sample project interface was built with SwiftUI, but the life cycle is still using UIKit App Delegate. Therefore, the rest of this article won’t be relevant for projects with SwiftUI App life cycle.
First, we need to update RecipeBaseClass to include the URL property. We will use the recipe’s name to arrange the URL, making sure to add percent encoding to encode the characters. I also set the name with removed whitespace as the default value.
public struct RecipeBaseClass: Codable, Hashable {

    // ...
    public var ingredients: [RecipeIngredients]?
    public var originalURL: String?
    public var imageURL: String?
    public var steps: [String]?
    public var name: String?
    public var time: Int?
    public var serving: String?
    public var widgetURL: URL?
    public init(from decoder: Decoder) throws {
        let container = try decoder.container(keyedBy: CodingKeys.self)
        ingredients = try container.decodeIfPresent([RecipeIngredients].self, forKey: .ingredients)
        originalURL = try container.decodeIfPresent(String.self, forKey: .originalURL)
        imageURL = try container.decodeIfPresent(String.self, forKey: .imageURL)
        steps = try container.decodeIfPresent([String].self, forKey: .steps)
        name = try container.decodeIfPresent(String.self, forKey: .name)
        time = try container.decodeIfPresent(Int.self, forKey: .time)
        serving = try container.decodeIfPresent(String.self, forKey: .serving)
       widgetURL = URL(string: "recipe://\((name ?? "").addingPercentEncoding(withAllowedCharacters: .urlQueryAllowed) ?? (name ?? "").filter { $0.isWhitespace })")
    }
    // ...
}
Then, in HeartyRecipeWidgetView.swift, we’re going to add the widgetURL modifier to HeartyRecipeWidgetSmallView as follows:
struct HeartyRecipeWidgetSmallView: View {
    var recipe: RecipeBaseClass?

    var body: some View {
        ZStack(alignment: .top) {
            Color(.white)
            VStack(alignment: .leading) {
                Image.loadLocalImage(image: recipe?.imageURL ?? "")
                    .centerCropped()
                    .frame(height: 64)
                    .cornerRadius(10)

                Text("\(recipe?.getTime() ?? "") • \(recipe?.serving ?? "1 portion")")
                    .font(.system(size: 10, weight: .regular, design: .default))
                Text(recipe?.name ?? "")
                    .font(.system(size: 12, weight: .semibold, design: .default))
                    .multilineTextAlignment(.leading)
            }
            .padding()
        }
        .widgetURL(recipe?.widgetURL)
    }
}
After that, you have to register your scheme so that the system directs appropriate URLs to your app. To register a custom URL scheme, you can either add entries to your Info.plist by hand, or you can go through the Info tab in the project’s settings. I prefer the latter.
- Select the HeartyRecipe project on the project navigator. Then in the editor pane under the Info tab and URL Types click the “+” button.
 |
- Update the URL Types section. The identifier field is equal to your app’s bundle identifier.
- Specify the prefix you use for your URLs. This will be “recipe” according to the widgetURL property we specified in RecipeBaseClass earlier.
 |
Adding scheme in the project’s settings will automatically update the Info.plist as shown in the following screenshot.
 |
Because we added the recipe scheme to the app’s Info.plist, now the app can handle the URLs that look as follows:
| recipe://host.with/a/path |
When the app is asked to handle this deep link, the scene(_:openURLContexts:) method on SceneDelegate is called. Let’s jump to SceneDelegate.swift and add the following code to handle the deep link.
import UIKit
import SwiftUI
import HeartyRecipeHelper
class SceneDelegate: UIResponder, UIWindowSceneDelegate {
    // ...

    func scene(_ scene: UIScene, openURLContexts URLContexts: Set<UIOpenURLContext>) {
        guard let url = URLContexts.first?.url else {
            return NSLog("No URL passed to open the app")
        }

        handleURL(url: url)
    }

}
extension SceneDelegate {

    func handleURL(url: URL) {
        guard let recipe = recipeData?.first(where: { $0.widgetURL == url }) else {
            let message = "Sorry, we can't find the recipe named \'\(url.host?.removingPercentEncoding ?? "")\'"
            let alertController = UIAlertController(title: "Recipe Not Found", message: message, preferredStyle: .alert)
            let okAction = UIAlertAction(title: "OK", style: UIAlertAction.Style.default, handler: nil)
            alertController.addAction(okAction)

            window?.rootViewController?.present(alertController, animated: true, completion: nil)

            return
        }

        if let nc = window?.rootViewController?.children.first?.children.first as? UINavigationController {
            nc.pushViewController(HostingController(rootView: DetailRecipeView(recipe: recipe)), animated: true)
        } else {
            window?.rootViewController?.present(HostingController(rootView: DetailRecipeView(recipe: recipe)), animated: true, completion: nil)
        }
    }

}
The scene(_:openURLContexts:) method will call the handleURL(url:) method and pass the first URL from the URLContexts. The handleURL(url:) method will try to find the RecipeBaseClass for the recipe that was tapped on the small widget by searching the first recipeData element that has widgetURL equal with the url. Once it’s found, we will navigate the rootViewController to the HostingController that holds the DetailRecipeView to show the corresponding recipeData element.
Now you can test the deep link. Make sure the HeartyRecipe app is the active scheme, then click play to build and run. When you tap the small widget, the app should now go directly to the DetailRecipeView with data corresponding to the recipe in the widget.
Does it work? Not fully. When you tap the small widget while the app is displaying the DetailRecipeView, it will push the DetailRecipeView again. This will cause multiple DetailRecipeView that are pushed into the navigation stack. In order to solve this, when the view controller currently being displayed is showing DetailRecipeView, we first have to go back to the root view controller, in this case the view controller that holds the ContentView. After that, we can navigate to the DetailRecipeView with the corresponding recipe data.
Let’s update the handleURL(url:) method like this.
func handleURL(url: URL) {
    guard let recipe = recipeData?.first(where: { $0.widgetURL == url }) else {
        let message = "Sorry, we can't find the recipe named \'\(url.host?.removingPercentEncoding ?? "")\'"
        let alertController = UIAlertController(title: "Recipe Not Found", message: message, preferredStyle: .alert)
        let okAction = UIAlertAction(title: "OK", style: UIAlertAction.Style.default, handler: nil)
        alertController.addAction(okAction)

        window?.rootViewController?.present(alertController, animated: true, completion: nil)

        return
    }

    if let nc = window?.rootViewController?.children.first?.children.first as? UINavigationController {
        // if the view currently being displayed is DetailRecipeView, go back to the root view controller
        if nc.title == "Detail Recipe" {
            nc.popToRootViewController(animated: true)
        }
        // push the DetailRecipeView
        nc.pushViewController(HostingController(rootView: DetailRecipeView(recipe: recipe)), animated: true)
    } else {
        window?.rootViewController?.present(HostingController(rootView: DetailRecipeView(recipe: recipe)), animated: true, completion: nil)
    }
}
Go ahead and test the app again. The app now should go back to the ContentView when we tap the small widget while the current displaying view in the app is the DetailRecipeView.
Now try to quit the HeartyRecipe app and then tap the small widget. Does the DetailRecipeView appear? No, the app just displays the ContentView.
When the app is launched on a cold start, the scene(_:openURLContexts:) method will not get called. You need to check whether the app is connected to a scene, and then perform actions that you would in the scene(_:openURLContexts:) method in the scene(_:willConnectTo:options:) method. So, update the scene(_:willConnectTo:options:) by adding the following code.
func scene(_ scene: UIScene, willConnectTo session: UISceneSession, options connectionOptions: UIScene.ConnectionOptions) {

    // ...

    DispatchQueue.main.asyncAfter(deadline: .now() + 1) { [weak self] in
        guard let self = self else { return }

        if let url = connectionOptions.urlContexts.first?.url {
            self.handleURL(url: url)
        }
    }
}
Now let’s run the app. When you press the small widget while the app is in the background, the app will launch and then display the DetailRecipeView.
Thank you for reading! You can find the final app project here.
Reference
Video about widget and alternate timeline
Xcode documentation on defining custom URL scheme
On StackOverflow about method scene openurlcontexts
Intan Nurjanah is an iOS Developer at GITS.ID.
GITS.ID is helping our clients with developing applications. The example is a mobile app based in Android and iOS, with Toyota. It can be read more here.